THIS PAGE IS A WORK IN PROGRESS! updated 03/16/2026
One part of being an amateur is to find new ways to communicate.
Mesh networks 915 MHz ISM band. Low-power, peer-to-peer network. Designed to send a 200-character encrypted message. No license required.
Used for: Find a use > Paintball to make sure blue on blue does not happen & mapping the field and where your team is. Hiking and outdoors as a tracking and communication device if there is no cell to keep the group in contact. Telemetry applications: data, Weather, connect to a Pi or Arduino. IOT Internet of Things and automation.
Great for outdoors in areas with no cell service. Backup comm for Cell. Tracking, sensor data, and analysis. A lot of ways to use the technology and add more to RC/Drones and Robots.
Meshtastic https://meshtastic.org/
Choosing a Radio Unit
There are a number of solid radio units commercially available. One of the benefits of LoRa is that the radios are relatively inexpensive. But as ham hobbyists know, things can still start to get more pricey as you look to improve the various components you use along with the radio.
A significant factor for many people will be the cost. For sub-$30, you can get a Heltec V3 kit with a stub antenna and battery. If you or a buddy has a 3D printer, you can even make a nice little case for a few cents. This is a very low-barrier entry point.
$36 will get you a bare bones RAK 4631 – which is more power efficient and expandable – along with a strip LoRa and bluetooth antenna. There are, of course, many other options out there. And for any particular unit, you can get add-on sensors, better batteries, better antennas, and/or solar panels that you can add for additional cost. Some companies worth considering are RAK wireless, LILYGO, Heltec, Muzi Works, and Seed Studio.
With LoRa, height and LOS are king. A $100 antenna won’t do you much good if your node is in your basement. So it’s a good idea to consider how and where you will mount your node before sinking a lot of money into peripherals.
Initial Setup & Configuration
No matter which LoRa radio you choose, the first step is going to be flashing the firmware to the unit. This will require some sort of internet-connected computer along with a USBc data cable. Depending on which radio unit you have, you may also need to get a USB serial driver for your computer.
Once you have that squared away, you will need to go to the Meshtastic flasher web page:
https://flasher.meshtastic.org/
It is recommended to use the Chrome web browser for this, since it allows direct communication with the USB serial device.
Pick your device from the list in step 1. Select which firmware version to use in step 2 – the recommendation is to use the latest stable beta version. Step 3 will vary based on your device. You may be able to use the wizard to flash the firmware directly. Or you may have to put your unit in flasher mode and then manually copy the firmware file. Whatever the case, the site will walk you through the steps.
Once the device firmware is flashed, you should be able to connect to the unit via Bluetooth with the Meshtastic app from your smart phone. You will need a PIN to connect to pair the bluetooth connection. That PIN will likely be 1234, 1213456, or 0000 – depending on your radio unit. Some units, like the Heltec V3 come with a screen that allows a random PIN that will show on the screen. Once connected via bluetooth, you can finalize the device setup. You will need to select a region – likely the United States. And you will need to select a preset. For Maryland, it’s recommend to use LONG_FAST. Finally, you will need to pick a device role. For the time being, just select CLIENT (more on this later).
At this point, you are ready to rock and roll. You can send out messages to the default LONG_FAST channel, and you will start seeing other people’s messages (assuming that you are close enough to anyone else).
Advanced Configuration
Now that you have the basic setup, there are a number of different settings you may wish to adjust. Here are some of the most notable settings to check out.
LoRa
This menu is where you can set the number of “hops” you message will take. Any message you send will have a hops number attached to it. And every other mesh node that repeats your message will reduce that number by 1 when it re-broadcasts your message. The default is 3, and the max is 7. Putting a high hop number will increase the traffic on the mesh and can cause it to bog down. At this point, in the Baltimore metro area, the traffic is not high enough to be worrisome. And since LoRa radio does not do great with tall buildings in the way, you may need additional hops to be able to get your message out a reasonable distance. So don’t be afraid to bump up to 5 hops. But play around with it and see what sort of range you get with various settings.
Channels
This menu is where you can setup your own encrypted channel. If you click on the + icon, you can set the name and encryption key for a new channel. If you share the key with other people, they can create a channel with the same key, and then you will be able to send messages viewable to only your group. You can also set whether you broadcast you location or uplink/downlink to MQTT for any particular channel. Turning on uplink means that any messages you send on that channel will also send through MQTT. Turning on downlink means that your node will receive any messages on the channel over MQTT. (More on MQTT later.) Turning on position for a channel will broadcast your position info in that channel. Turning this on for a private encrypted channel is how you would share you location with a specific set of people.
Security
Not much here to be too worried about. You can cycle your public & private keys if you think they have been compromised in some way.
User
This is where you can set the name and short name for your node. It’s also where you can toggle on the “unmessageable” status for any node that will be un-monitored infrastructure.
Device
This menu is where you can set/change the device role. Most likely, you will want to use the CLIENT or CLIENT_BASE role. CLIENT is the best pick for the node that you will be using to send & receive messages. CLIENT_BASE is the best pick if you are setting up a stationary node at your home or work whose primary role is sending out the messages from your CLIENT node from a better vantage point.
There are a bunch of other device roles. The most tempting for people will likely be the REPEATER or ROUTER roles. But these roles should be used with caution. They should only be used if you have a seriously prime spot – like a radio tower on top of a mountain. More information on that topic can be found here:
https://meshtastic.org/blog/choosing-the-right-device-role/
Position
In this menu you can make adjustments to how your node reports position. If you do not have a GPS module installed, you can also manually set your GPS coordinates here.
Power
This menu gives some options for changing power settings – including turning on low power mode.
Network
This menu allows you to put compatible devices on a WiFi network, so that you can reach them on your LAN – rather than via bluetooth. Be careful here. Some models can only support EITHER bluetooth or LAN and one time. So if you turn on the WiFi network connection, you will lose the bluetooth connection and you will need to make any further changes through the web interface.
Display
Various display settings
Bluetooth
This is where you can set the Bluetooth connection PIN for any unit that doesn’t have a screen or the ability to generate a random PIN.
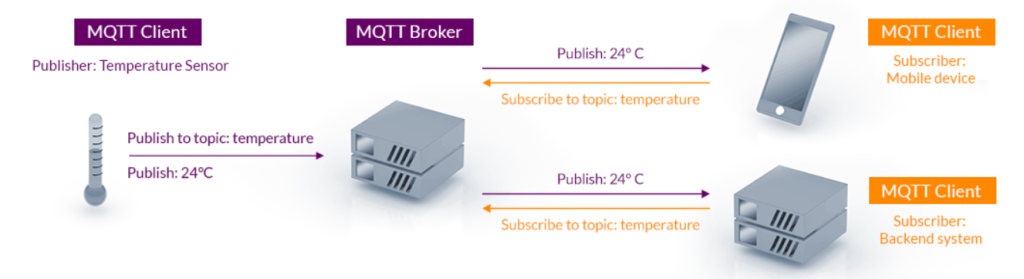
MQTT
MQTT: The Standard for IoT Messaging over the Internet https://mqtt.org/
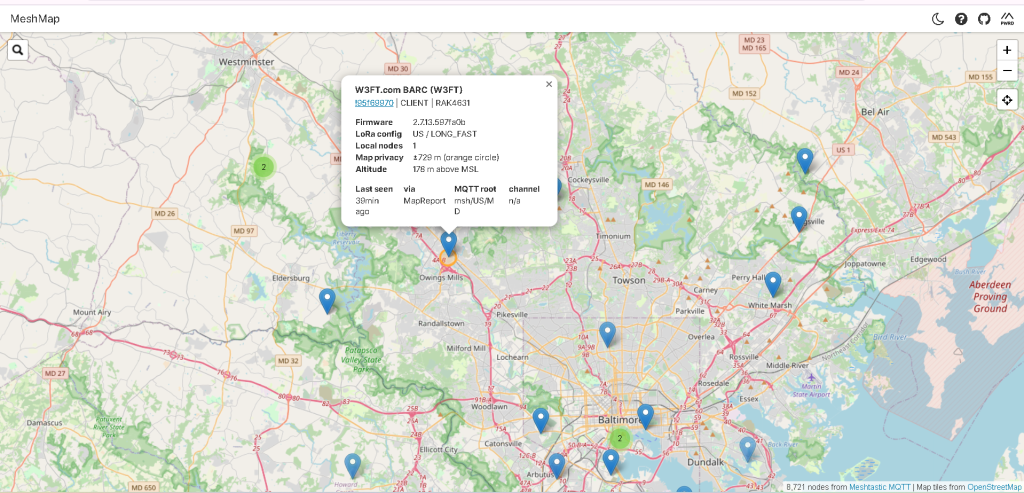
MQTT allows your device to send to and/or receive & rebroadcast messages from the internet. Notably, having your node report over MQTT is required to have it show up on MeshMap. Technically, you can report your position to the LongFast channel without having any other MQTT settings enabled. But this relies on some other node within range having both MQTT and uplink on the LongFast channel enabled in order to have your location info reach the internet and MeshMap; it takes the control out of your hands.
https://meshmap.net/
There are a number of settings required to actually start using MQTT.
Module Configuration > MQTT
The first step is to toggle on MQTT and choose which MQTT server you want to use. The Meshtastic MQTT server will be auto-populated along with the username and password. Unless you have setup your own MQTT server or gateway, just stick with the defaults.
If you do not have the node connected to a network with internet access (e.g. you are using the node via bluetooth from your smart phone), you will also need to toggle on the “Proxy to client enabled” option. This allows the radio to use your phone’s internet connection, since it doesn’t have its own.
This is also where you can turn on map reporting to have your node report to MeshMap.
Radio Configuration > LoRa
Here you will need to toggle the “Ignore MQTT” option off and the “Ok to MQTT” option on.
Radio Configuration > Channels
You will need to ensure that at least one channel is configured to allow uplink or downlink. Uplink will send data from your device out to MQTT. Downlink will receive MQTT messages and rebroadcast them from your node.
If you just want to have your node report to MeshMap, then you should toggle “Uplink enabled” and “Position enabled” on the default LongFast channel. You can also set how precise your location will be reported.
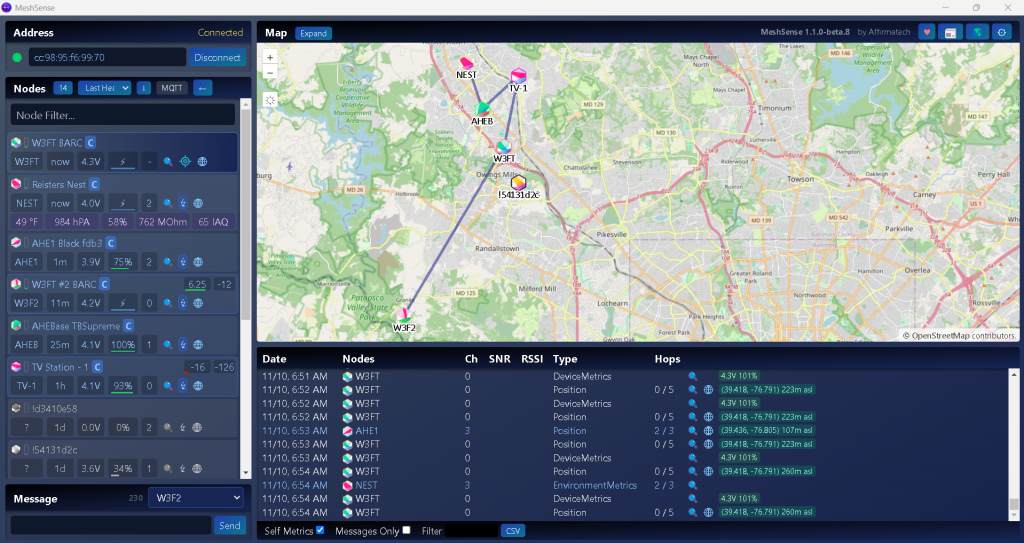
Current W3FT node setup:
PRIMARY node:
Long Name: W3FT BARC
Short Name: W3FT
Alpha firmware
Rak Wisblock 4631 with GNSS/GPS Antenna 20 cm 5 db gain
Secondary node:
Short Name: W3F2
Stable firmware
Rak Wisblock 4631 1-inch antenna (13 km range with perfect LOS + High Alt node to low) Pt to point 1 to 3 miles avg
Local Links:
https://dmv-mesh.org/index.html Settings for MD, VA, or MVA.
http://www.nemarc.org/mesh.html Good for a look at gear and application.
https://meshsense.affirmatech.com Windows, Linux, we tested.
https://meshsense.affirmatech.com Global MAP
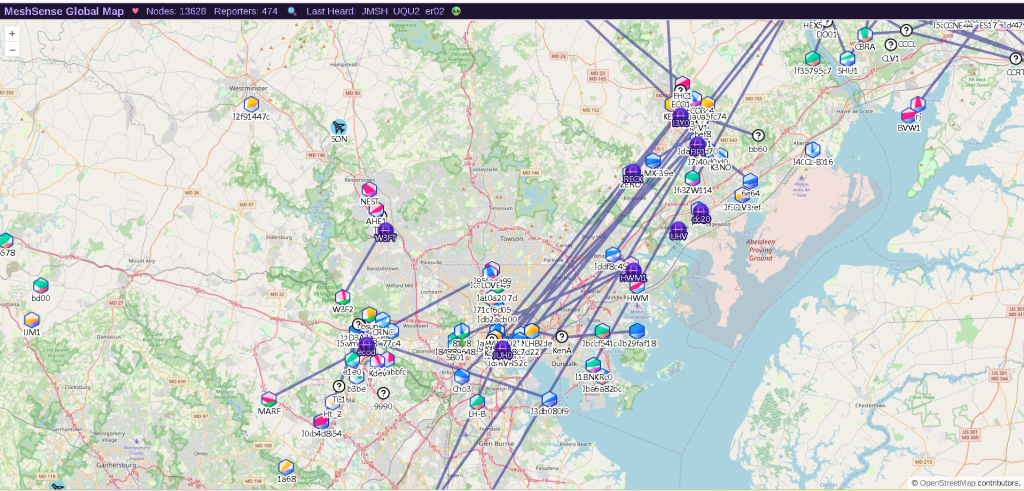
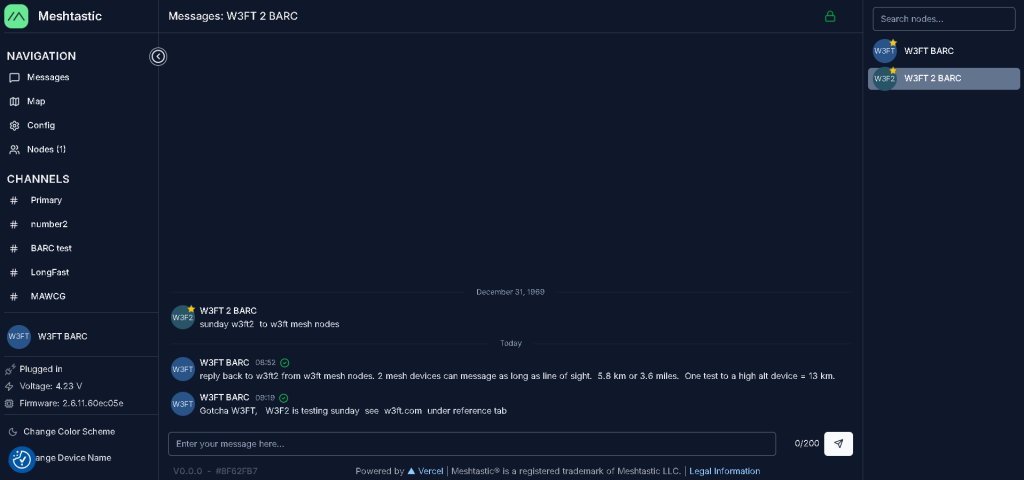
Message up to 200 characters. This shows 2 nodes connected by RF.
https://meshmap.net Shows MQTT for Mesh
Android or IOS code for your cell:
MQTT https://mqtt.org/